Setting up an out-of-office message in the Outlook app is a breeze, ensuring you stay professional and communicative, even when you’re not at your desk. This guide will walk you through the process step-by-step, making sure your out-of-office replies are set up perfectly in no time.
Why Set Up an Out-of-Office Message?
Ever wondered why out-of-office messages are crucial? They’re not just courteous; they’re a professional way to manage expectations and maintain communication while you’re away. Whether you’re on vacation, attending a conference, or out for a few hours, setting up an out-of-office reply in the Outlook app keeps your contacts informed and helps manage their expectations.
Getting Started with Out-of-Office in Outlook App
- Open the Outlook App: Start by launching the Outlook app on your device. Ensure you’re logged in to the account you want to set the out-of-office reply for.
- Navigate to Settings: Tap on your profile picture or the menu icon, then scroll down to find the ‘Settings’ option.
- Select the Account: Choose the email account for which you want to set up the out-of-office message.
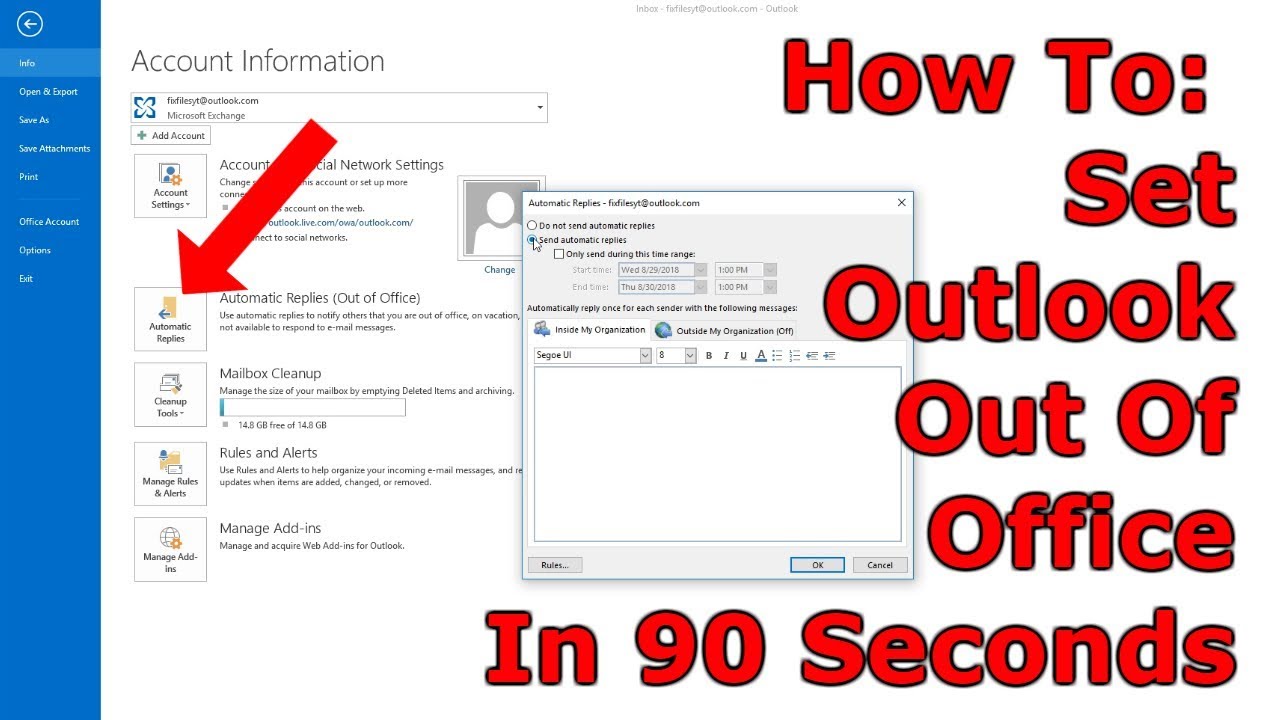
- Find the Automatic Replies Option: Look for the ‘Automatic Replies’ (Out of Office) section and tap on it.
Setting Up Your Out-of-Office Reply
- Enable Automatic Replies: Toggle the switch to enable automatic replies. This action activates the out-of-office feature for your selected email account.
- Craft Your Message: Write a clear, concise message that informs your contacts of your absence and when they can expect a response. Be sure to include any alternative contact information if urgent matters arise.
- Set the Duration: You can specify start and end dates for your out-of-office replies. This ensures that the automatic responses are only active during your actual time away.
- External Replies: Decide if you want to send out-of-office replies to emails outside your organization. This is particularly useful if you interact with clients or partners regularly.
Advanced Tips for Out-of-Office Messages
- Personalization is Key: Tailor your out-of-office messages to reflect your personality or your company’s brand. A touch of humor or a friendly tone can make your automatic replies more engaging.
- Update Your Calendar: Block out your time away in the Outlook calendar. This helps colleagues know when you’re unavailable and reduces the chances of scheduling conflicts.
- Check for Updates: Ensure your Outlook app is up to date to access the latest features and security enhancements for a smoother out-of-office setup.
Conclusion
Setting up an out-of-office reply in the Outlook app is straightforward and essential for maintaining professionalism and communication flow. By following the steps outlined above, you can ensure that your contacts are well informed of your availability, allowing you to enjoy your time away without worrying about missed emails.
Frequently Asked Questions
- Can I set up out-of-office replies for multiple accounts in Outlook?
Yes, you can set up out-of-office replies for each email account you have added to the Outlook app. Simply repeat the process for each account. - Will my out-of-office replies be sent to every email I receive?
Out-of-office replies are typically sent once to each sender to inform them of your absence. You can customize settings for internal and external senders. - Can I schedule out-of-office replies in advance?
Yes, the Outlook app allows you to schedule your out-of-office replies in advance by specifying start and end dates. - What should I include in my out-of-office message?
Your message should include the duration of your absence, whether you’ll have limited access to email, and alternative contact information for urgent matters. - How do I turn off out-of-office replies?
Out-of-office replies will automatically turn off after the end date you’ve set. You can also manually turn it off by going back to the ‘Automatic Replies’ settings and disabling it.