Ever wondered how to zoom out on Mac to get a better view of your screen? Whether you’re trying to see the bigger picture or accommodate more content, knowing how to effectively zoom out (and in) on your Mac can significantly enhance your user experience. Let’s dive into the various methods available, ensuring you can navigate your Mac like a pro.
1. Zooming Out on Individual Windows
Using Keyboard Shortcuts: The quickest way to zoom out on a specific app or window is by utilizing keyboard shortcuts. Simply press Command and the “-” key simultaneously. Keep pressing “-” until you’ve achieved the desired zoom level. This method is perfect for quickly adjusting the view within specific apps or documents.
Trackpad Gestures: For those who prefer not using keyboard shortcuts, the trackpad offers a simple solution. Pinch your fingers together on the trackpad to zoom out. This method is intuitive and works seamlessly in apps like Photos and Preview, though it may vary in functionality across different applications.
2. Zooming Out the Entire Screen
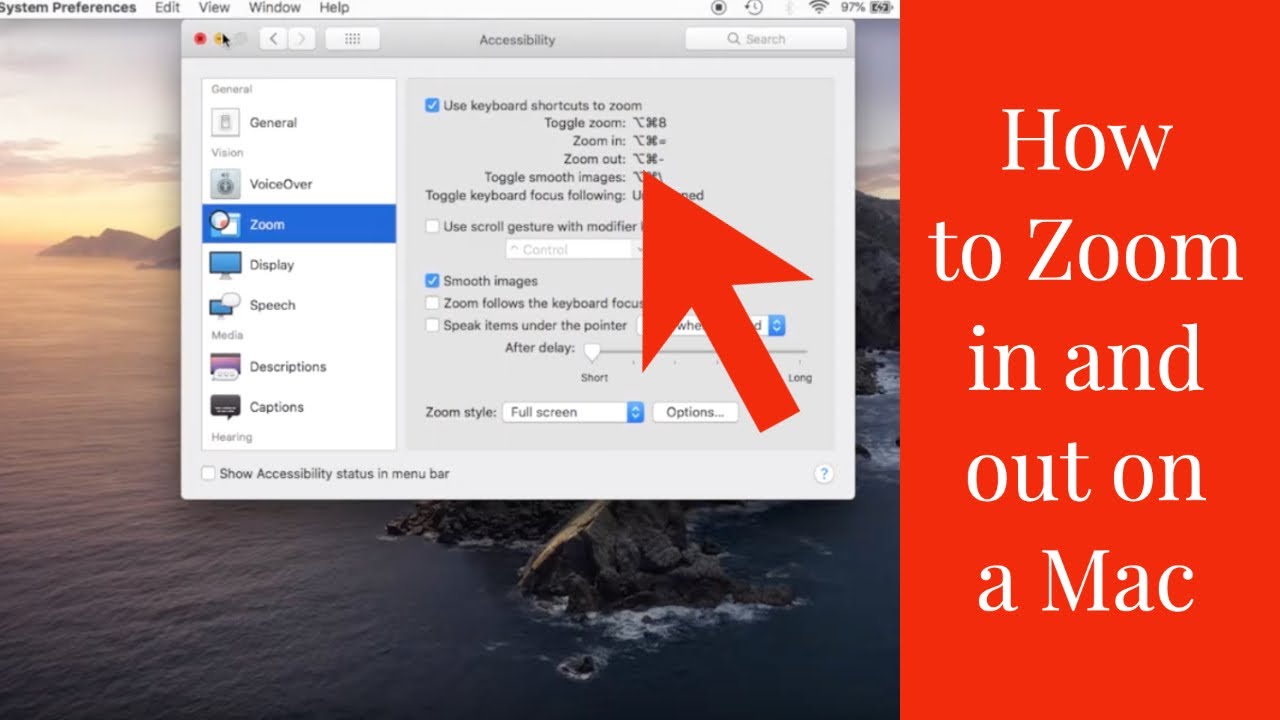
Accessibility Features: Mac’s Accessibility settings provide comprehensive options for zooming in and out of the entire screen. Navigate to System Settings, select Accessibility, and then Zoom to explore these features.
Keyboard Shortcuts for Full-Screen Zoom: Enable “Use keyboard shortcuts to zoom” within the Accessibility settings to use Option + Command + 8 for toggling zoom, Option + Command + “=” to zoom in, and Option + Command + “-” to zoom out. Adjust image smoothness with Option + Command + “\” if needed.
Using a Trackpad or Mouse: Enable “Use scroll gesture with modifier keys to zoom” in Accessibility settings. Select a modifier key (Control, Option, or Command) and use it in conjunction with scrolling to zoom in and out on the entire screen.
Tap to Zoom: Another full-screen zoom method involves tapping the trackpad. Enable “Use trackpad gesture to zoom” in Accessibility settings and use a double-tap with three fingers to zoom in and out.
3. Zooming with the Touch Bar
For Macs equipped with a Touch Bar, zooming can also be achieved through this feature. Enable “Touch Bar zoom” in Accessibility settings and slide your finger across the Touch Bar to zoom in and out.
4. Customizing Zoom Features
MacOS allows users to customize how zoom functions, including the zoom style (Full Screen, Split Screen, Picture-in-Picture), and the size and location of the zoom area. These settings can be adjusted in the Zoom section within Accessibility settings, providing a tailored zoom experience.
5. Additional Tips and Tricks
Remember, zooming isn’t just about seeing things up close or far away; it’s about optimizing your interaction with your Mac. Explore the various settings and shortcuts to find what works best for you.
Conclusion
Mastering how to zoom out on Mac enhances your computing experience, allowing you to adjust your view according to your needs quickly. Whether through keyboard shortcuts, trackpad gestures, or Accessibility features, Mac offers a range of options to suit every user’s preference.
FAQs
How do I zoom out on a specific window on my Mac?
Use Command + “-” for quick zooming out, or utilize the pinch gesture on your trackpad.
Can I zoom out on the entire screen of my Mac?
Yes, access the Zoom settings in the Accessibility pane of System Settings to enable full-screen zooming options.
Is it possible to customize the zoom function on my Mac?
Absolutely! MacOS allows you to customize the zoom style, size, and location through the Accessibility settings.
Can I use the Touch Bar to zoom in and out on my Mac?
Yes, if your Mac has a Touch Bar, enable the “Touch Bar zoom” option in Accessibility settings for this functionality.
What should I do if the zoomed image is not clear?
Adjust the smoothness of the image using the Option + Command + “\” keyboard shortcut after zooming in.